The first thing you need to do before you start embroidering on tiny onesies is to find a tutorial written by someone who’s embroidered more than 5 onesies in their life and read that. But you should totally read this blog post, too. Why? You know how you sometimes forget about all of the problems you had when you started something. I didn’t forget about any problems because I just had them. So this blog post is more like a report on my first experience with onesie embroidery. (Which is also my first experience with soft knit embroidery. I know, smart. ) And then, at the end, there’s 2 ideas how to cover mistakes up.
1. Gather the supplies.
First you’ll need onesies. Most hight street shops with a kids department carry them (I did not know that, maybe you did). Primark has packs of 3 for 3 pounds. I got those.
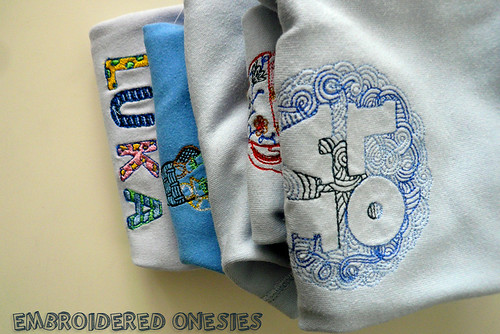
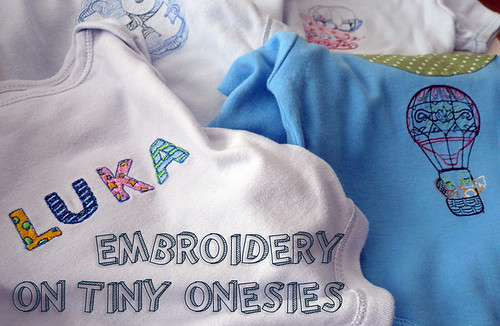
Then get some designs. I’d say it’s way better if you get designs with a low density of stitches. I got all of mine form Urban Threads (I get all of my designs there. They are always pretty and work perfectly). I also digitized a design and that didn’t go that well, but this isn’t about my problems with digitizing.
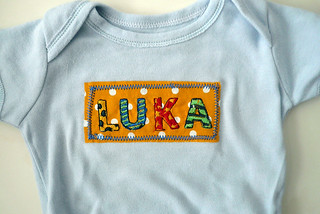
It’s the “Luka” one. The future babie’s future name is going to be Luka. He will live on the third floor, if you grew up in the late 80ies/early 90ies and were wondering. Luka is the most popular Slovenian boy’s name, the parents were not huge Suzanne Vega fans.
Then you definitely need a ballpoint needle. I used a 70, because I bought a set of them and that was the smallest size in there. The internet generally said 75. I forgot to change the needle just when I started and the thread kept ripping and it looked weird. Once I’ve changed it, everything got better.
You’ll also need iron on stabilizer, mid weight. I usually use the non ironon variety (because it’s cheaper and works perfectly fine with all of my other nonstrech projects), but you really need an iron on, so eveyrthing is really stable and doesn’t move around or stretch.
The last thing you’ll need is soft embroidery backing, which will protect the baby skin from irritation from the stitches. You iron that on after the design was stitched out and it’s supposed to stay there for ever. All of this stuff is quite expensive, but you don’t really need much of either the stabilizer or backing so you can buy the smallest possible quantity- and you’ll still have leftovers for other projects (t-shirts, here I come!)

2. Hooping
Hopping a tiny onesie is bitch. For all of the designs I did, the perfect hoop size was the second smallest one (6×5 inch, I think). I’m pretty sure that’s also the perfect size for onesie hooping. The width of it is quite similar to the width of the onesie – so once you try to move everything that’s not hooped out of the way, there’s not much left.
I tried 3 different methods of hooping and all of them are quite ridiculous. You could, if you own a serger and have way to much patience cut the sides, hoop the front, embroider it and than sew the onesie back together. But I don’t. I did however find that the method in the link, from step 5 on wasn’t that horrible. (Yes, I ignored all the previous steps and just ironed a piece of interfacing to the back of the front side of the onesie. I’m OK with not perfectly placed designs. It’s for a baby, he doesn’t care. )
http://mommysapronstrings.blogspot.co.uk/2012/01/photo-tutorial-how-to-hoop-embroider.html
So basicly: turn the onesie inside out, iron on the interfacing, place the onesie on the hoop with the interfaced side down. Put the upper part of the hoop inside, hoop the onesie. Strech the rest of the onesie around the hoop, through the bottom opening.
I used masking tape to tape the sides of the onesie out of the way.
Also, if putting the onesie on a hoop is so hard, how the f* are you supposed to put it on a tiny (possibly screaming) human. I definitely don’t want babies of my own. Being an aunt, especially on an island far away from the actual baby, suits me perfectly. I can make all the cute stuff, I don’t have to change nappies!
3. Embroidering
Have some chopsticks or something similar handy so that you can move fabric out of the way when you’re embroidering and you don’t endanger you fingers. Otherwise, proceed as usual.
4. Making mistakes into features.
I lost a onesie right at the start. I washed them with some newly bought pink fabric, so the once white onesie is now pink (I do have an idea on how to save it, though). If I wouldn’t have genius ideas on how to cover mistakes, I’d loose two more. But I did manage to save them, by turning the mistakes into interesting features. (I used to work in advertising as a copywriter. Making things sound good was my job.) So the last advice I have for you- have some matching cotton on hand. And bondaweb. Just in case.
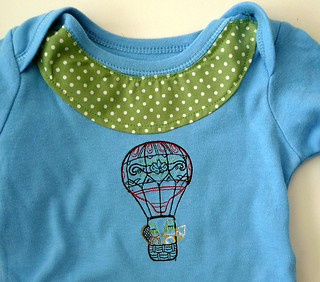
This one was the one I tried embroidering on first, hooping it a different way. Because I’m not smart, I also tried it with a design I digitized myself (not the Luka one. Another one I deleted and never want to see again). The result was a red blob of pulling thread right next to the collar. I gave up onesie embroidering for two days. Then I tried it with the UT design and the inside out hooping and it worked perfectly, so I had to save the onesie somehow. Unpicking the stitches on top was a pain and took forever. Then there were all all these holes left and a part of the fabric was stretched out of shape. So I made a lovely collar to cover the whole thing up:)
The next one was the last one I worked on. Confident by my other 4 successes, I left the machine to go make some tea. And as it always happens, I came back to an error message, a nest of thread around the needle and the onesie stuck in the machine. I carefully took it out, but there was no way I could continue with the stitching. A tiny part of fabric was completely stretched out. I decided to just do the same design on a piece of cotton and appliqué it over the top. Voila.
I think this baby is going to have a vast amount of embroidered clothes. Even thought they are quite frustrating to hoop and easily destroyed, they are just SO darn cute! And he’s going to be the only baby in the family for quite some time…